Discover how today’s most successful IT leaders stand out from the rest. Read the report

Not all tasks are created equal. While tracking assignees and due dates is a great place to start, it doesn’t paint the full picture of the task at hand. Is it high priority? Is it ready for final approval? Is it for your website, email, or product? Tracking these details lets you know where to focus your efforts, how work is progressing, and what it will impact. Custom fields in Asana Premium help you track this data and more.
With custom fields, you can collect and track the specific information you need to move projects forward. Then use this information to organize work and run reports to make better decisions, faster.
To make custom fields more powerful and well, customizable 😉, we’ve recently added new functionality so it’s easier to capture and manage info for your team’s work. Here are four new ways to use them:
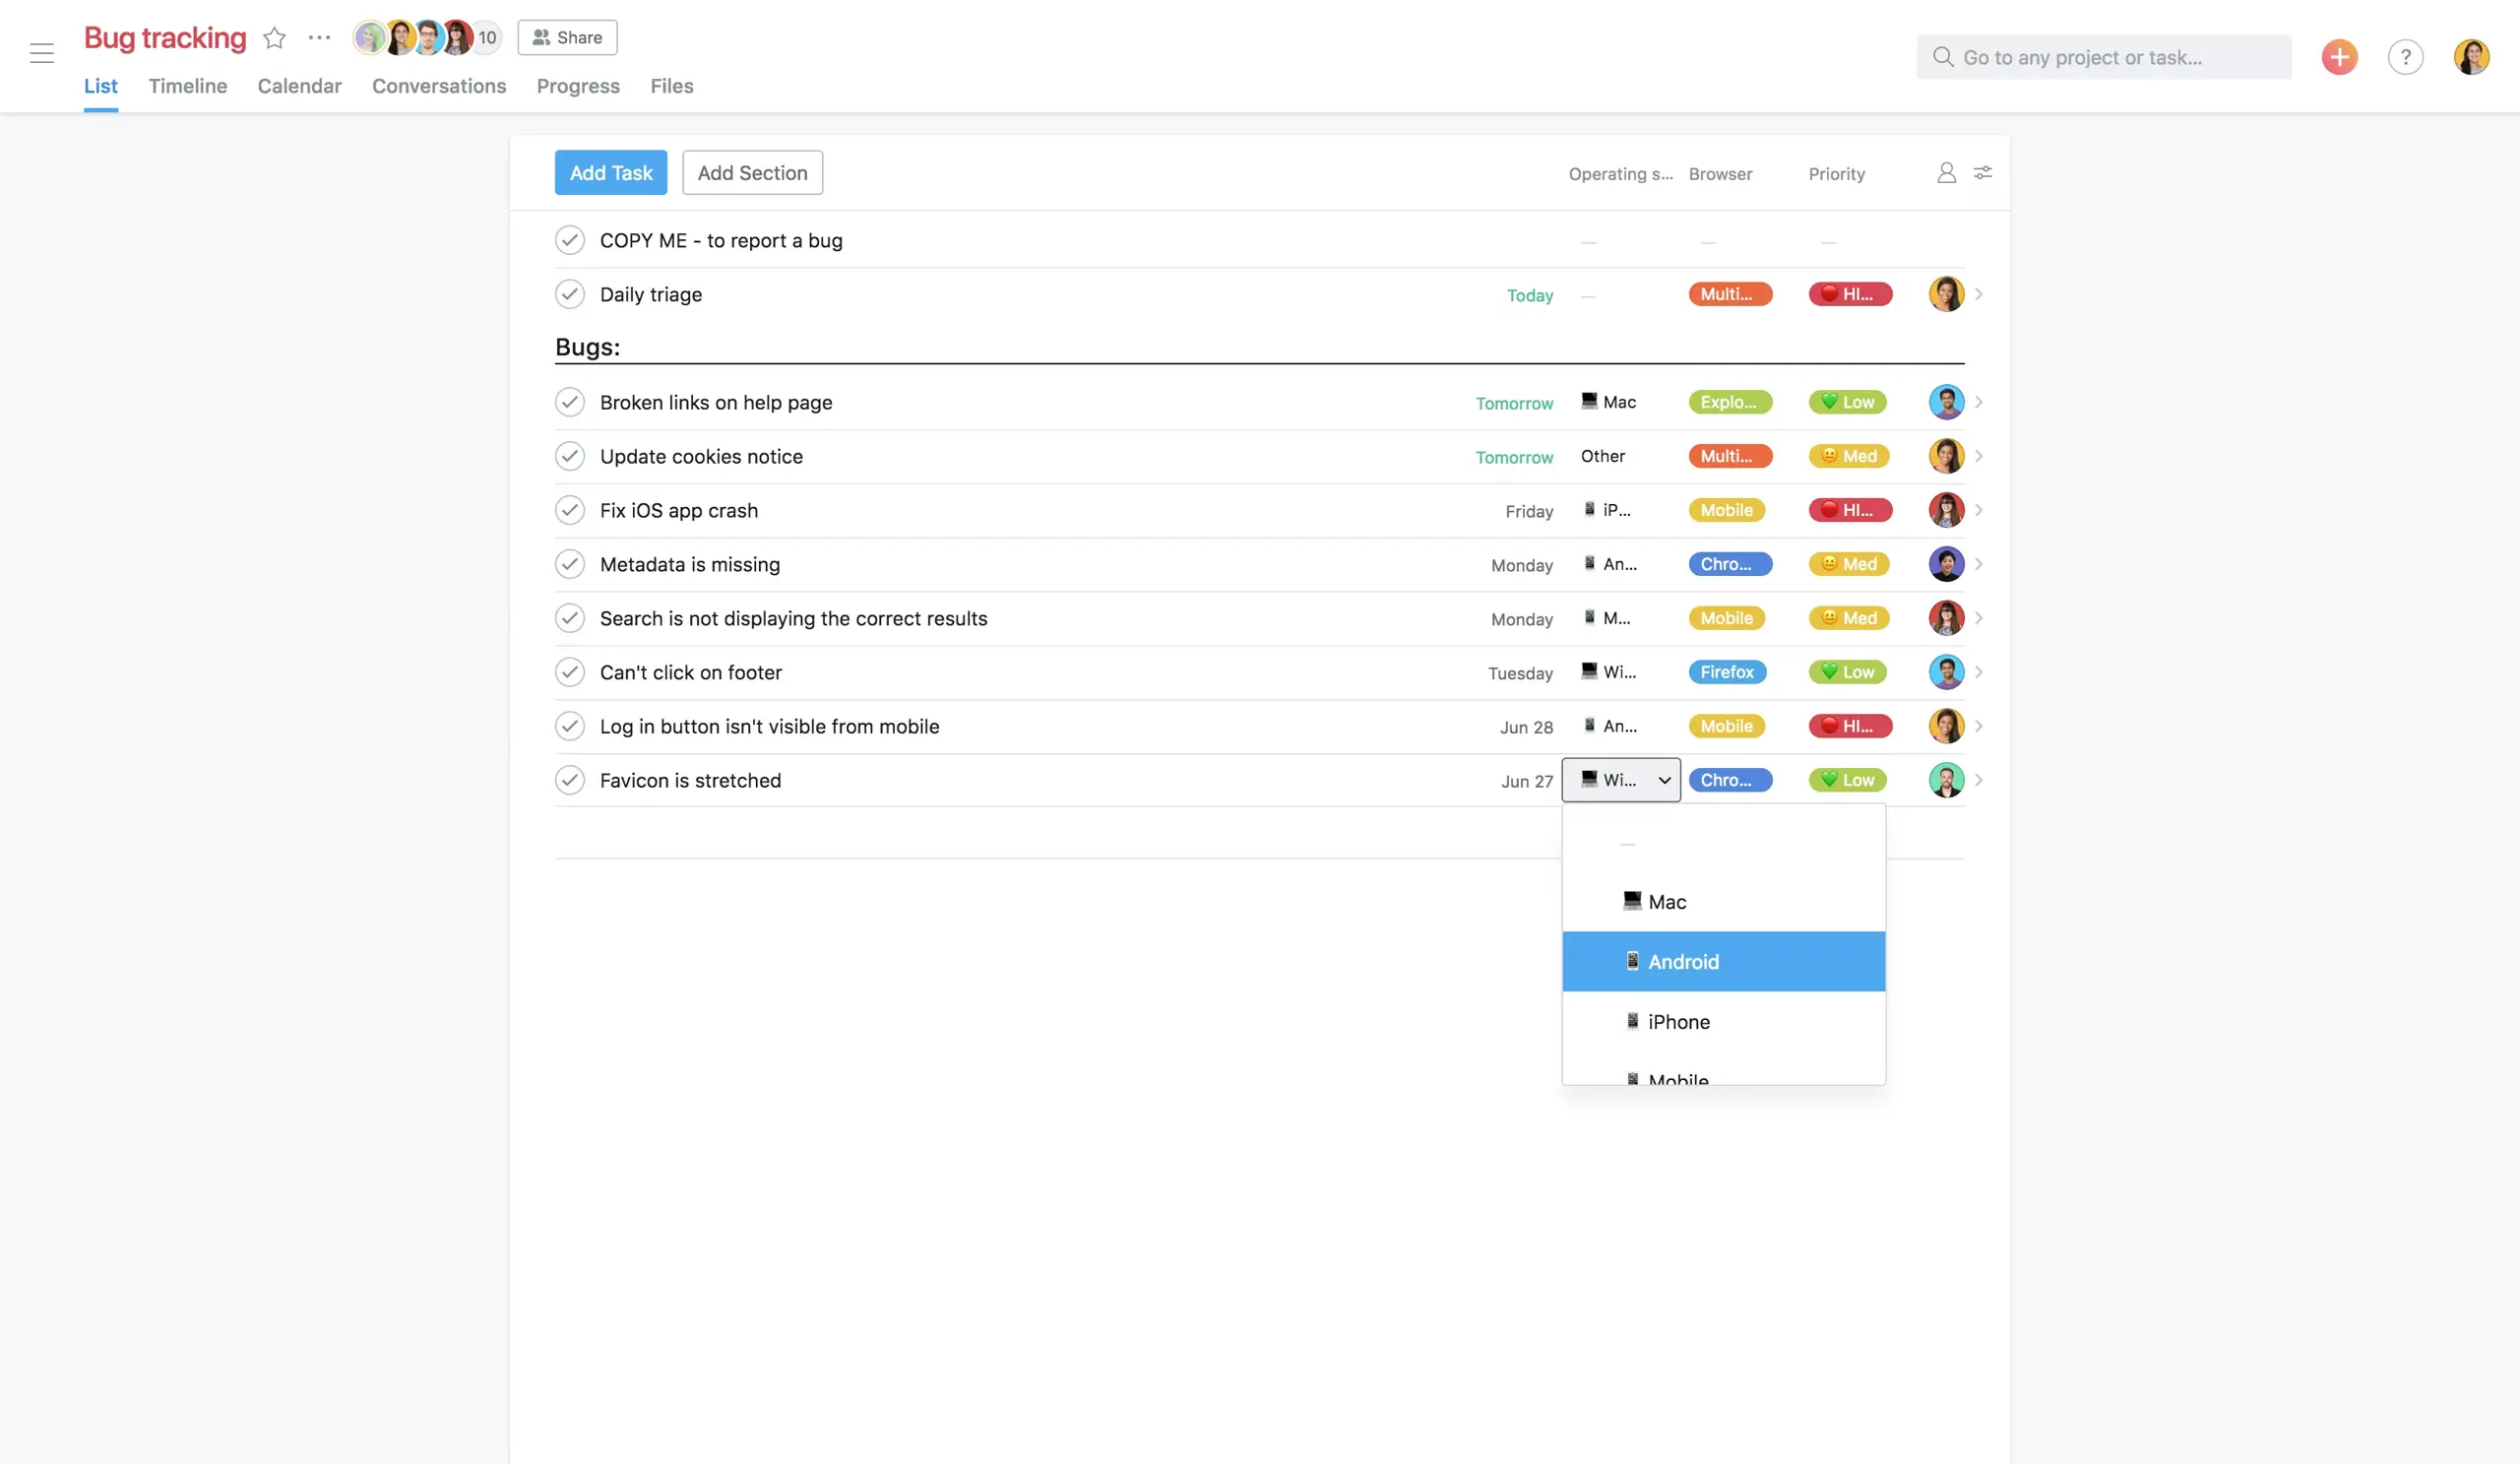
1. Add emojis to field values for easy scanning 🎉
Emojis are a way of life 🙌. Or as others might say, “a form of communication.” And now you can add them to your custom fields in Asana 👏.
Within custom fields, emojis do double duty. They help you visually communicate a message 👍 and your tone 😁. Many of us communicate through a 🖥 or 📱 for most (or all) of our workday, so this visual context helps you understand the information within fields quickly.
To add emojis to existing or new custom fields, click Manage Custom Fields… in your project’s actions dropdown menu, then click Add Field to Project or the gear icon on the right side of the field to edit the existing values. Copy and paste the emoji(s) you want to use from the text formatting menu in the task description or comment field. Then save your changes, and you’re all set ✅.
Use emojis in custom fields to help communicate:
Priority: P1 🔴, P2 ⚫, P3 🔵
Approval stage: Ready for review : 🔎, Approved ✔, Changes needed ✏
Status of work: On track 👍, At risk ⚠, Off track ⛔
Team: Design 🎨, Finance 📊, Sales 💰
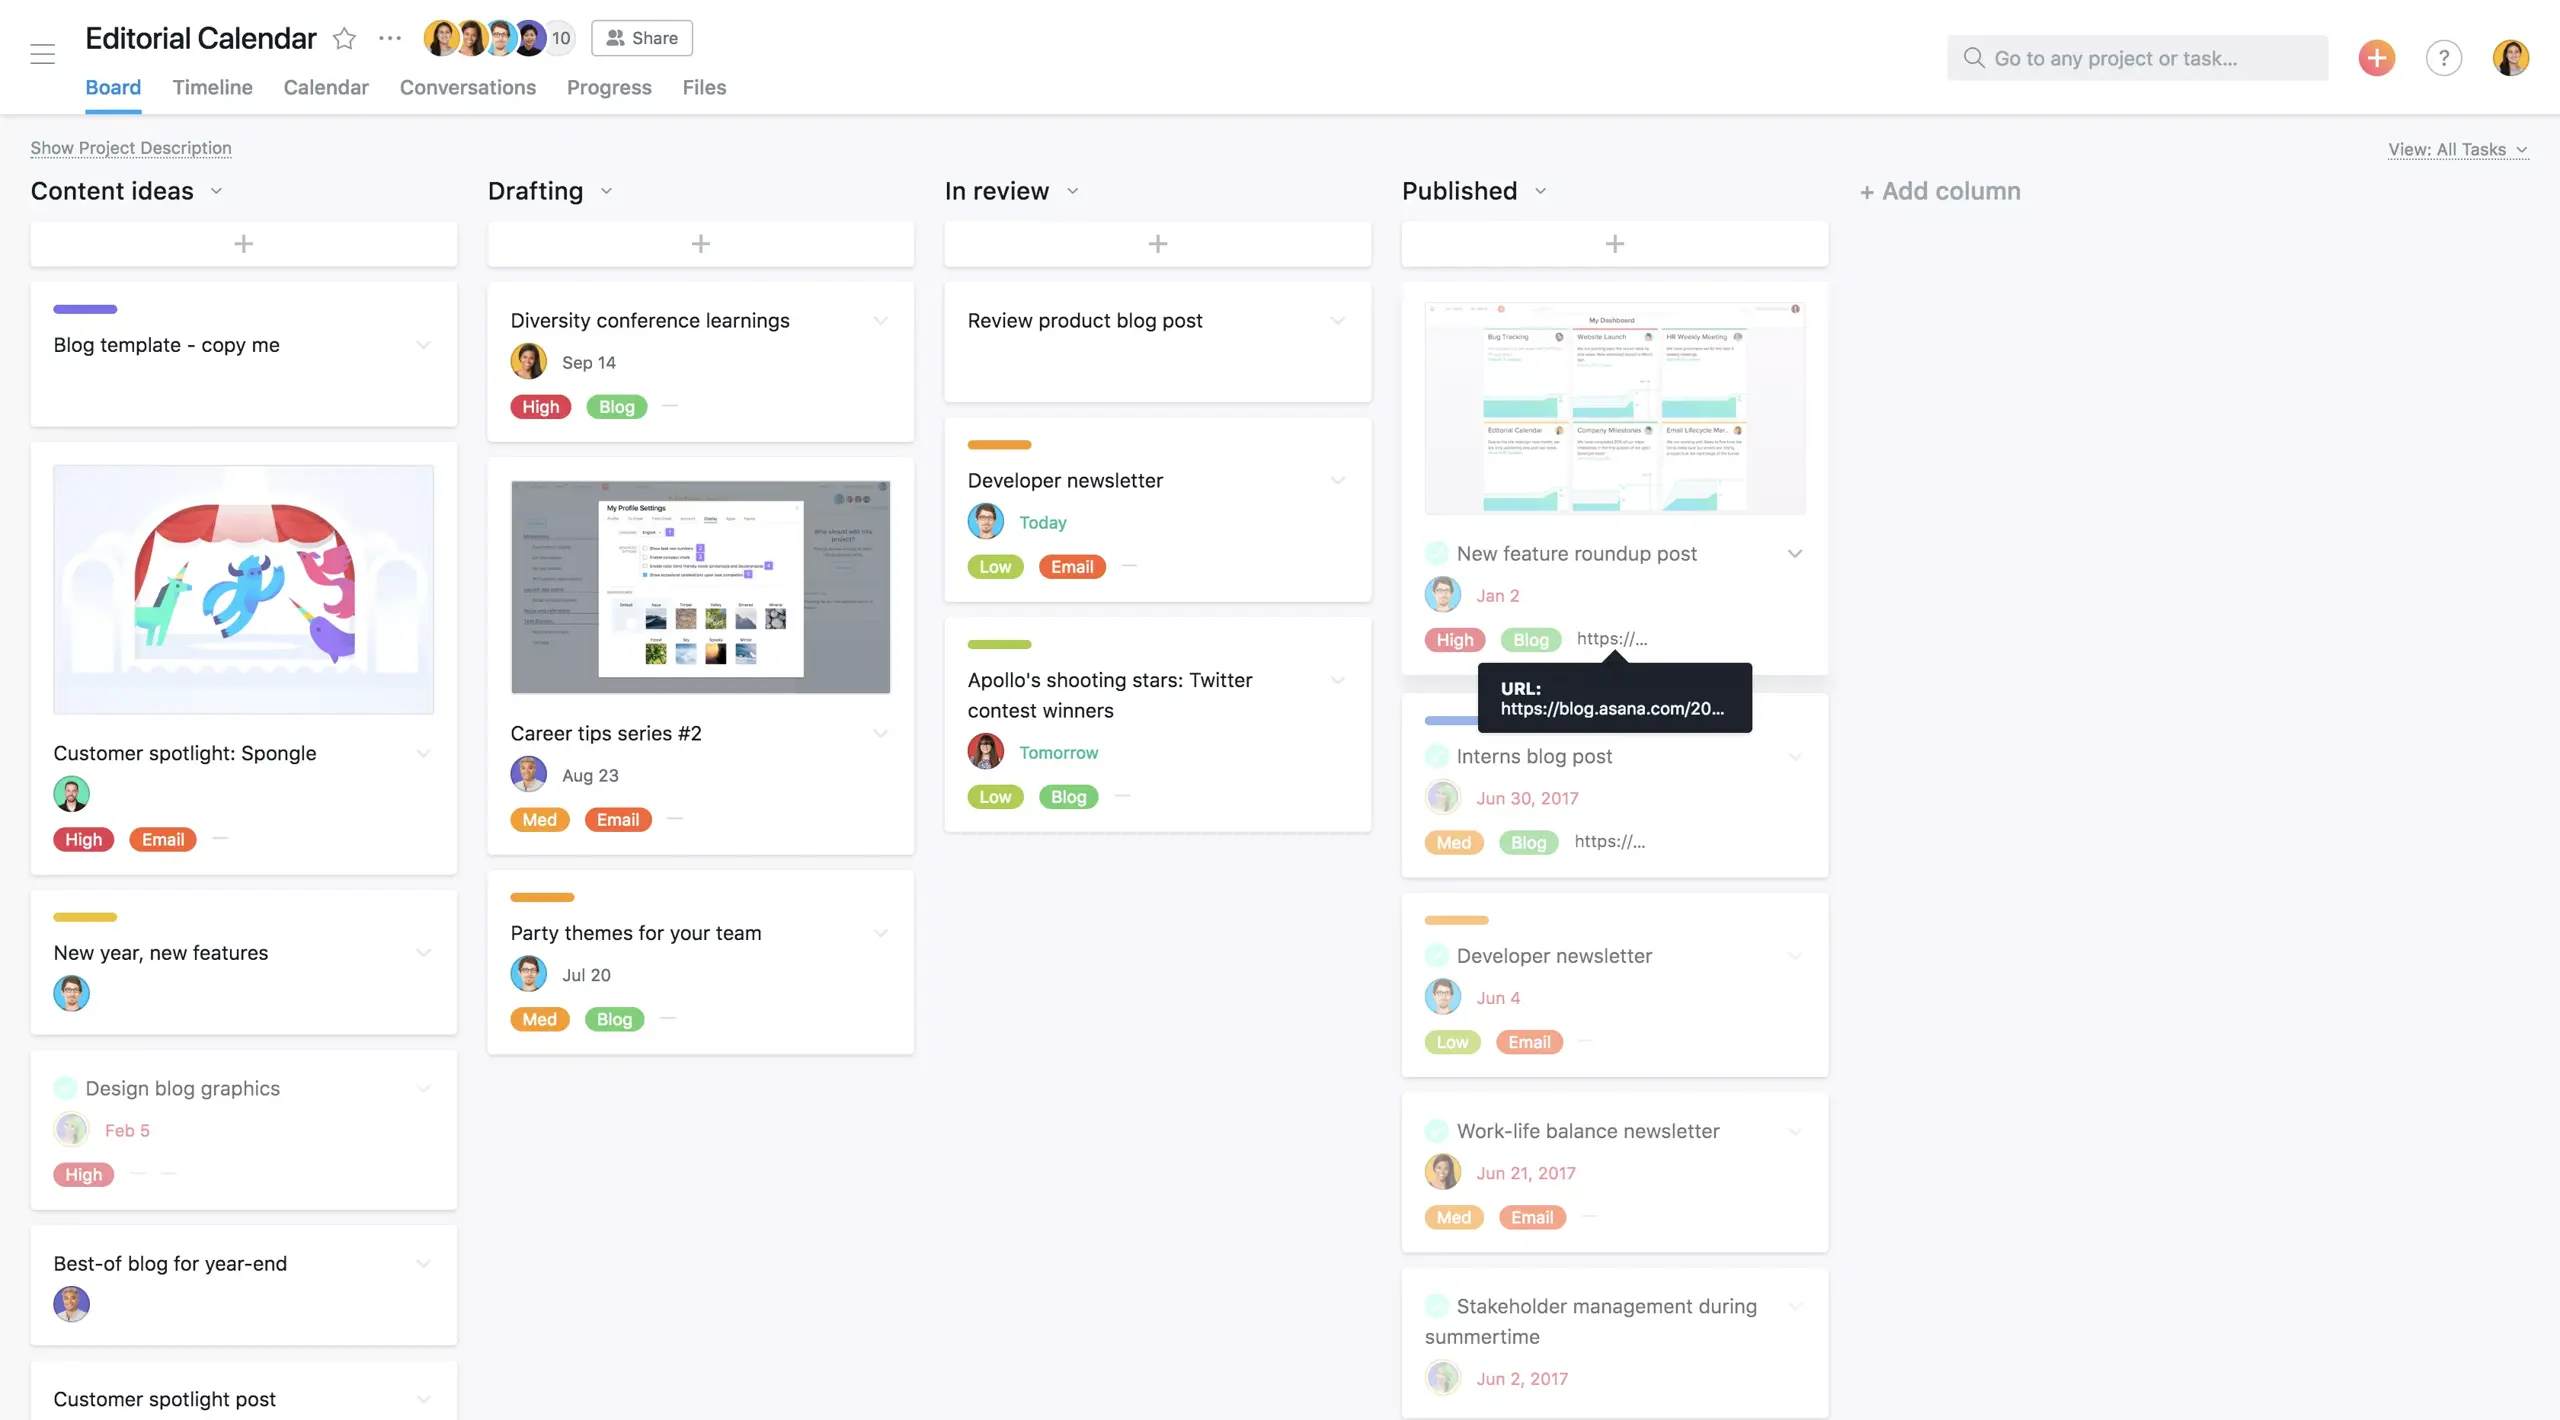
2. Track links so everyone’s on the same (web) page
“What’s the link to that web page again?” is a question you’ve probably asked a teammate (more than once). But now you can track links in custom fields (make sure to use a text field), so you won’t have to. Just enter the link into the text field so anyone can easily revisit the exact page without having to ask for it or go on a scavenger hunt for the URL. The best part? When you click a link from a custom field, the page will open in a new window.
Tracking links in custom fields are helpful for:
Creative requests: Keep track of which web page each design and copy task is for.
Editorial calendars: Add published blog post links to tasks for future reference.
Bug tracking: Specify the page that’s causing error messages for visitors so your web dev team can fix it.
Company objective and goal tracking: Include the link to dashboards or reports related to the objective so you can see progress.
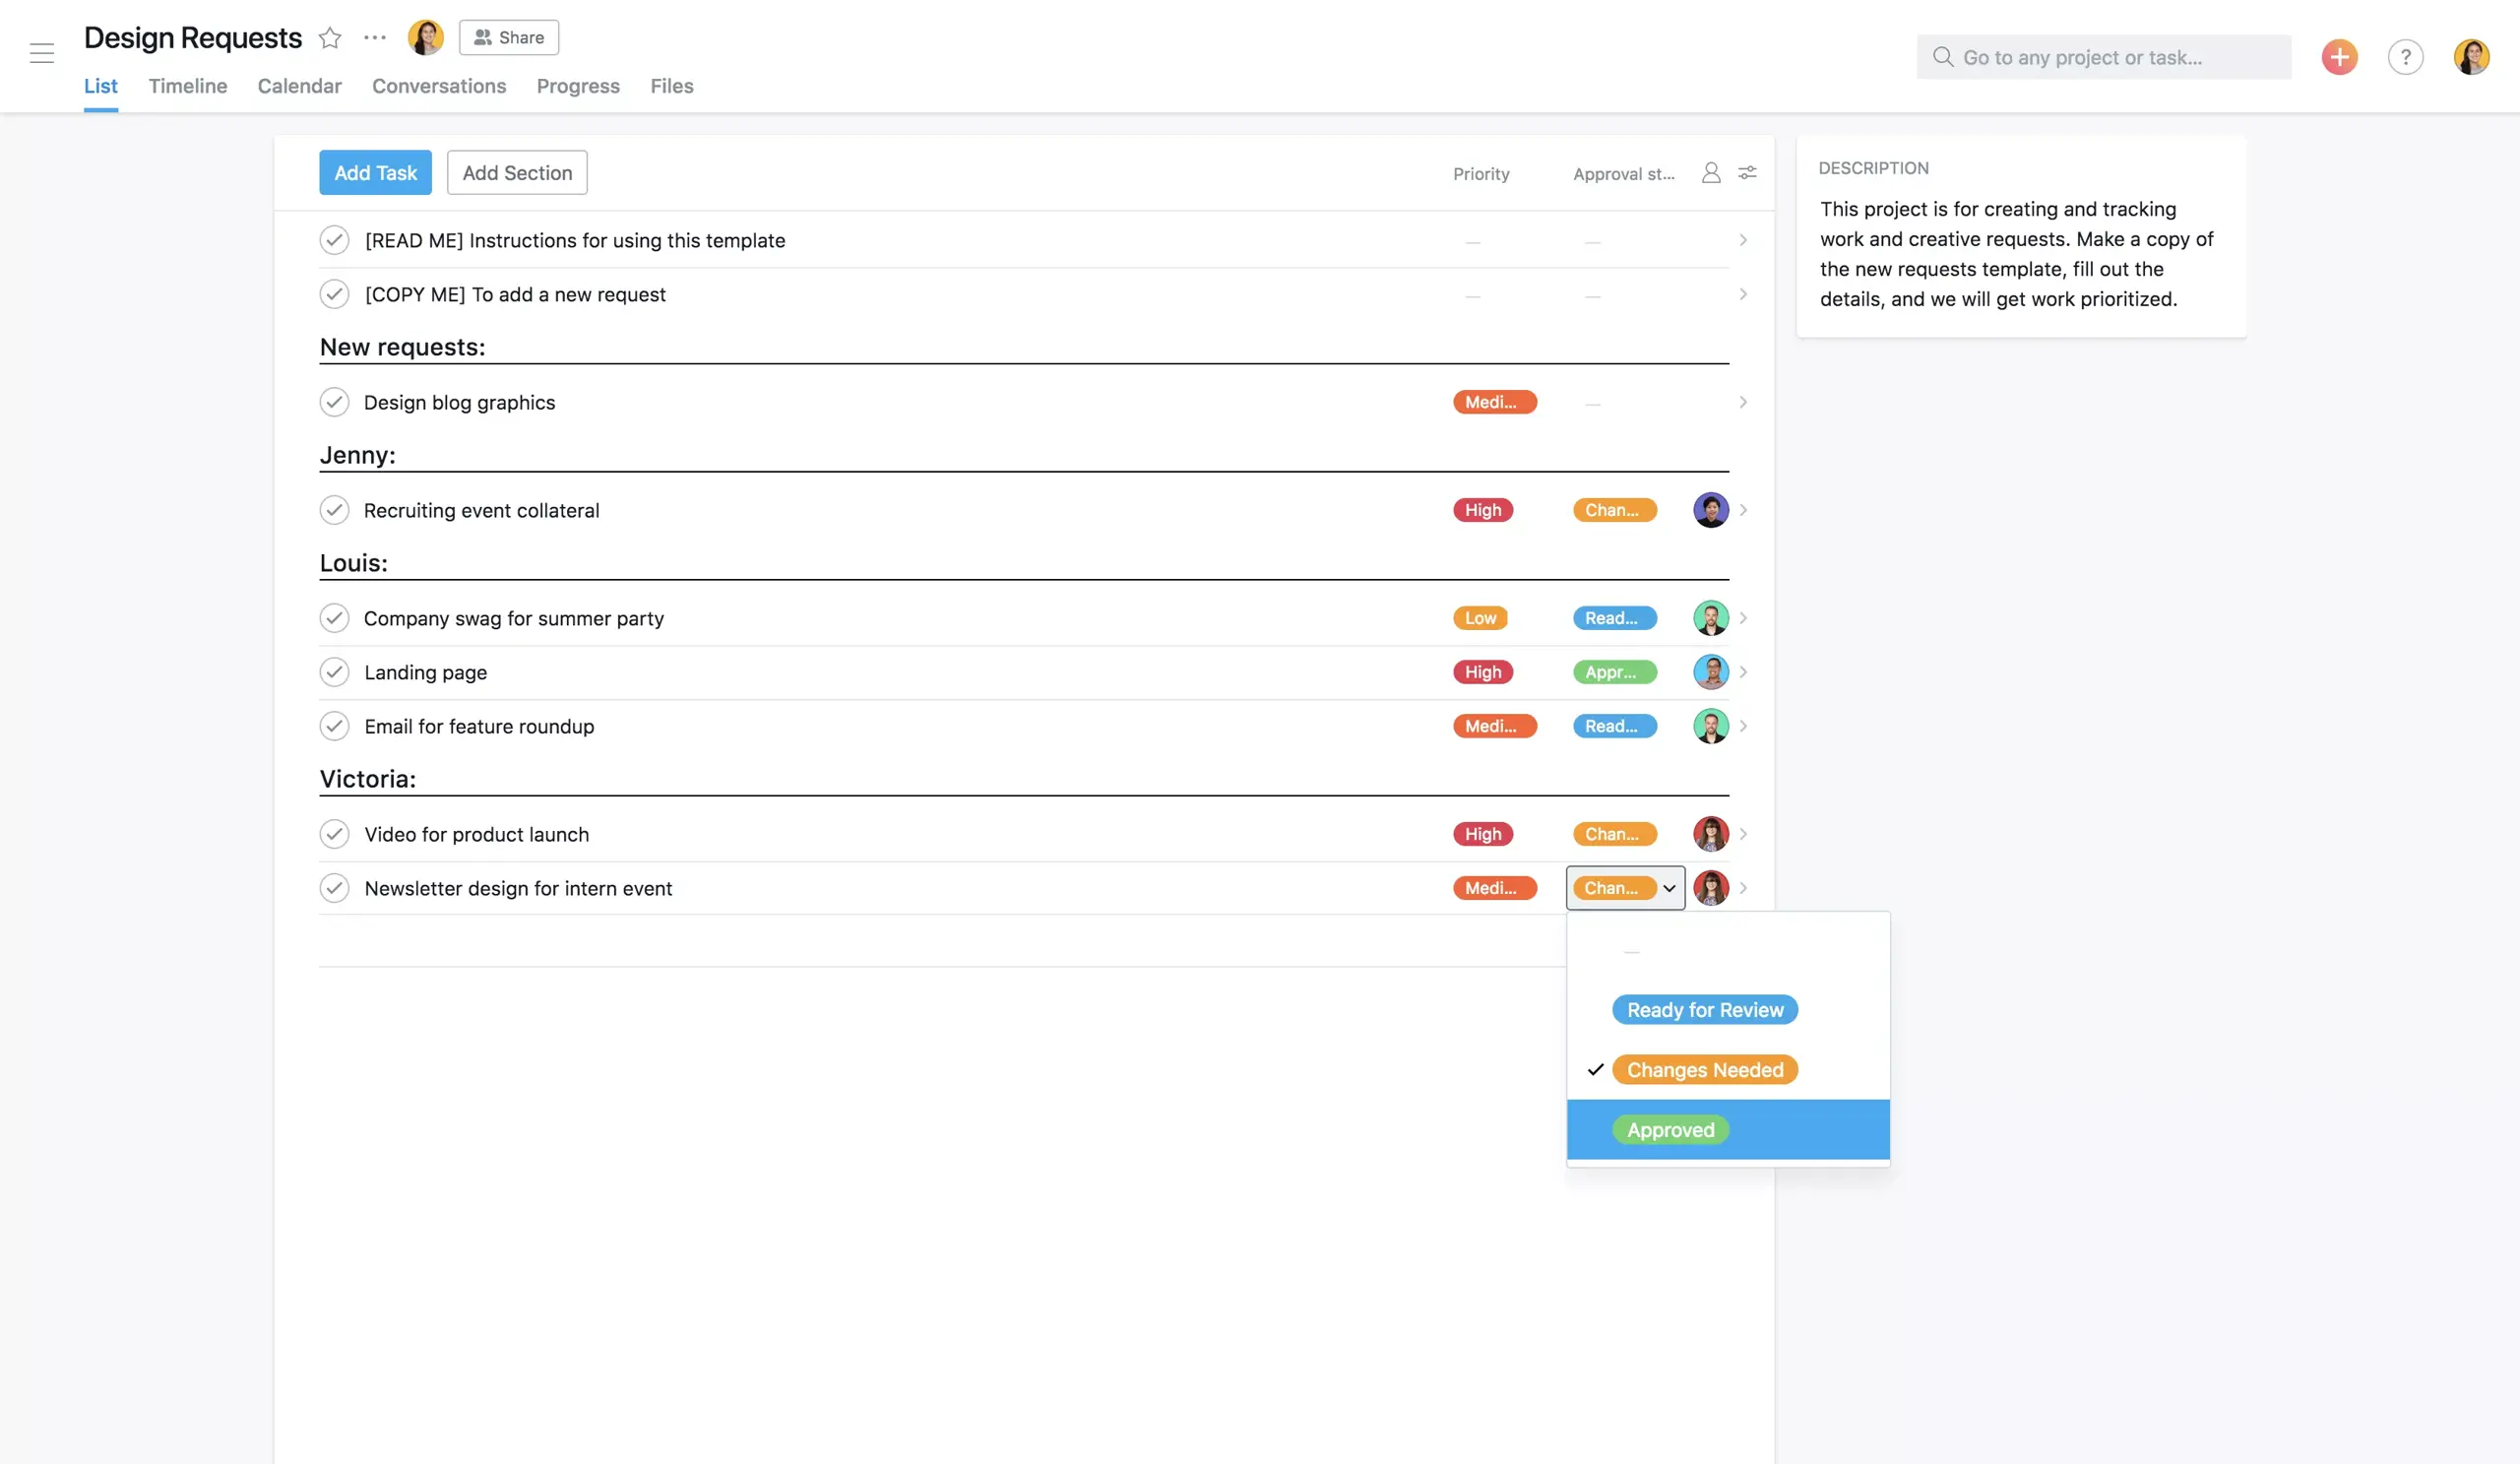
3. Set priority and approval stage with templates
If you’re not sure which custom fields to use, start your next project with an Asana-created template, which include fields for the specific workflow. For example, the Work and Creative Requests template includes a Priority field so you can specify whether the request is high, medium, or low priority. It also has an Approval stage custom field so you can specify whether work is Ready for Review, Changes Needed, or is Approved.
How to use the Approval stage custom field:
Once you’ve completed your work for the task, update the Approval status to “Ready for Review.”
Assign the task to the approver so they can review your work.
The approver updates the custom field to “Changes Needed” if updates need to be made or “Approve”’ if it’s ready to go after they’ve reviewed your work.
The approver assigns the task back to you to update or complete.
You can also create Advanced Search reports using the Approval stage field and other criteria, such as work assigned to you, to see where to focus your effort.
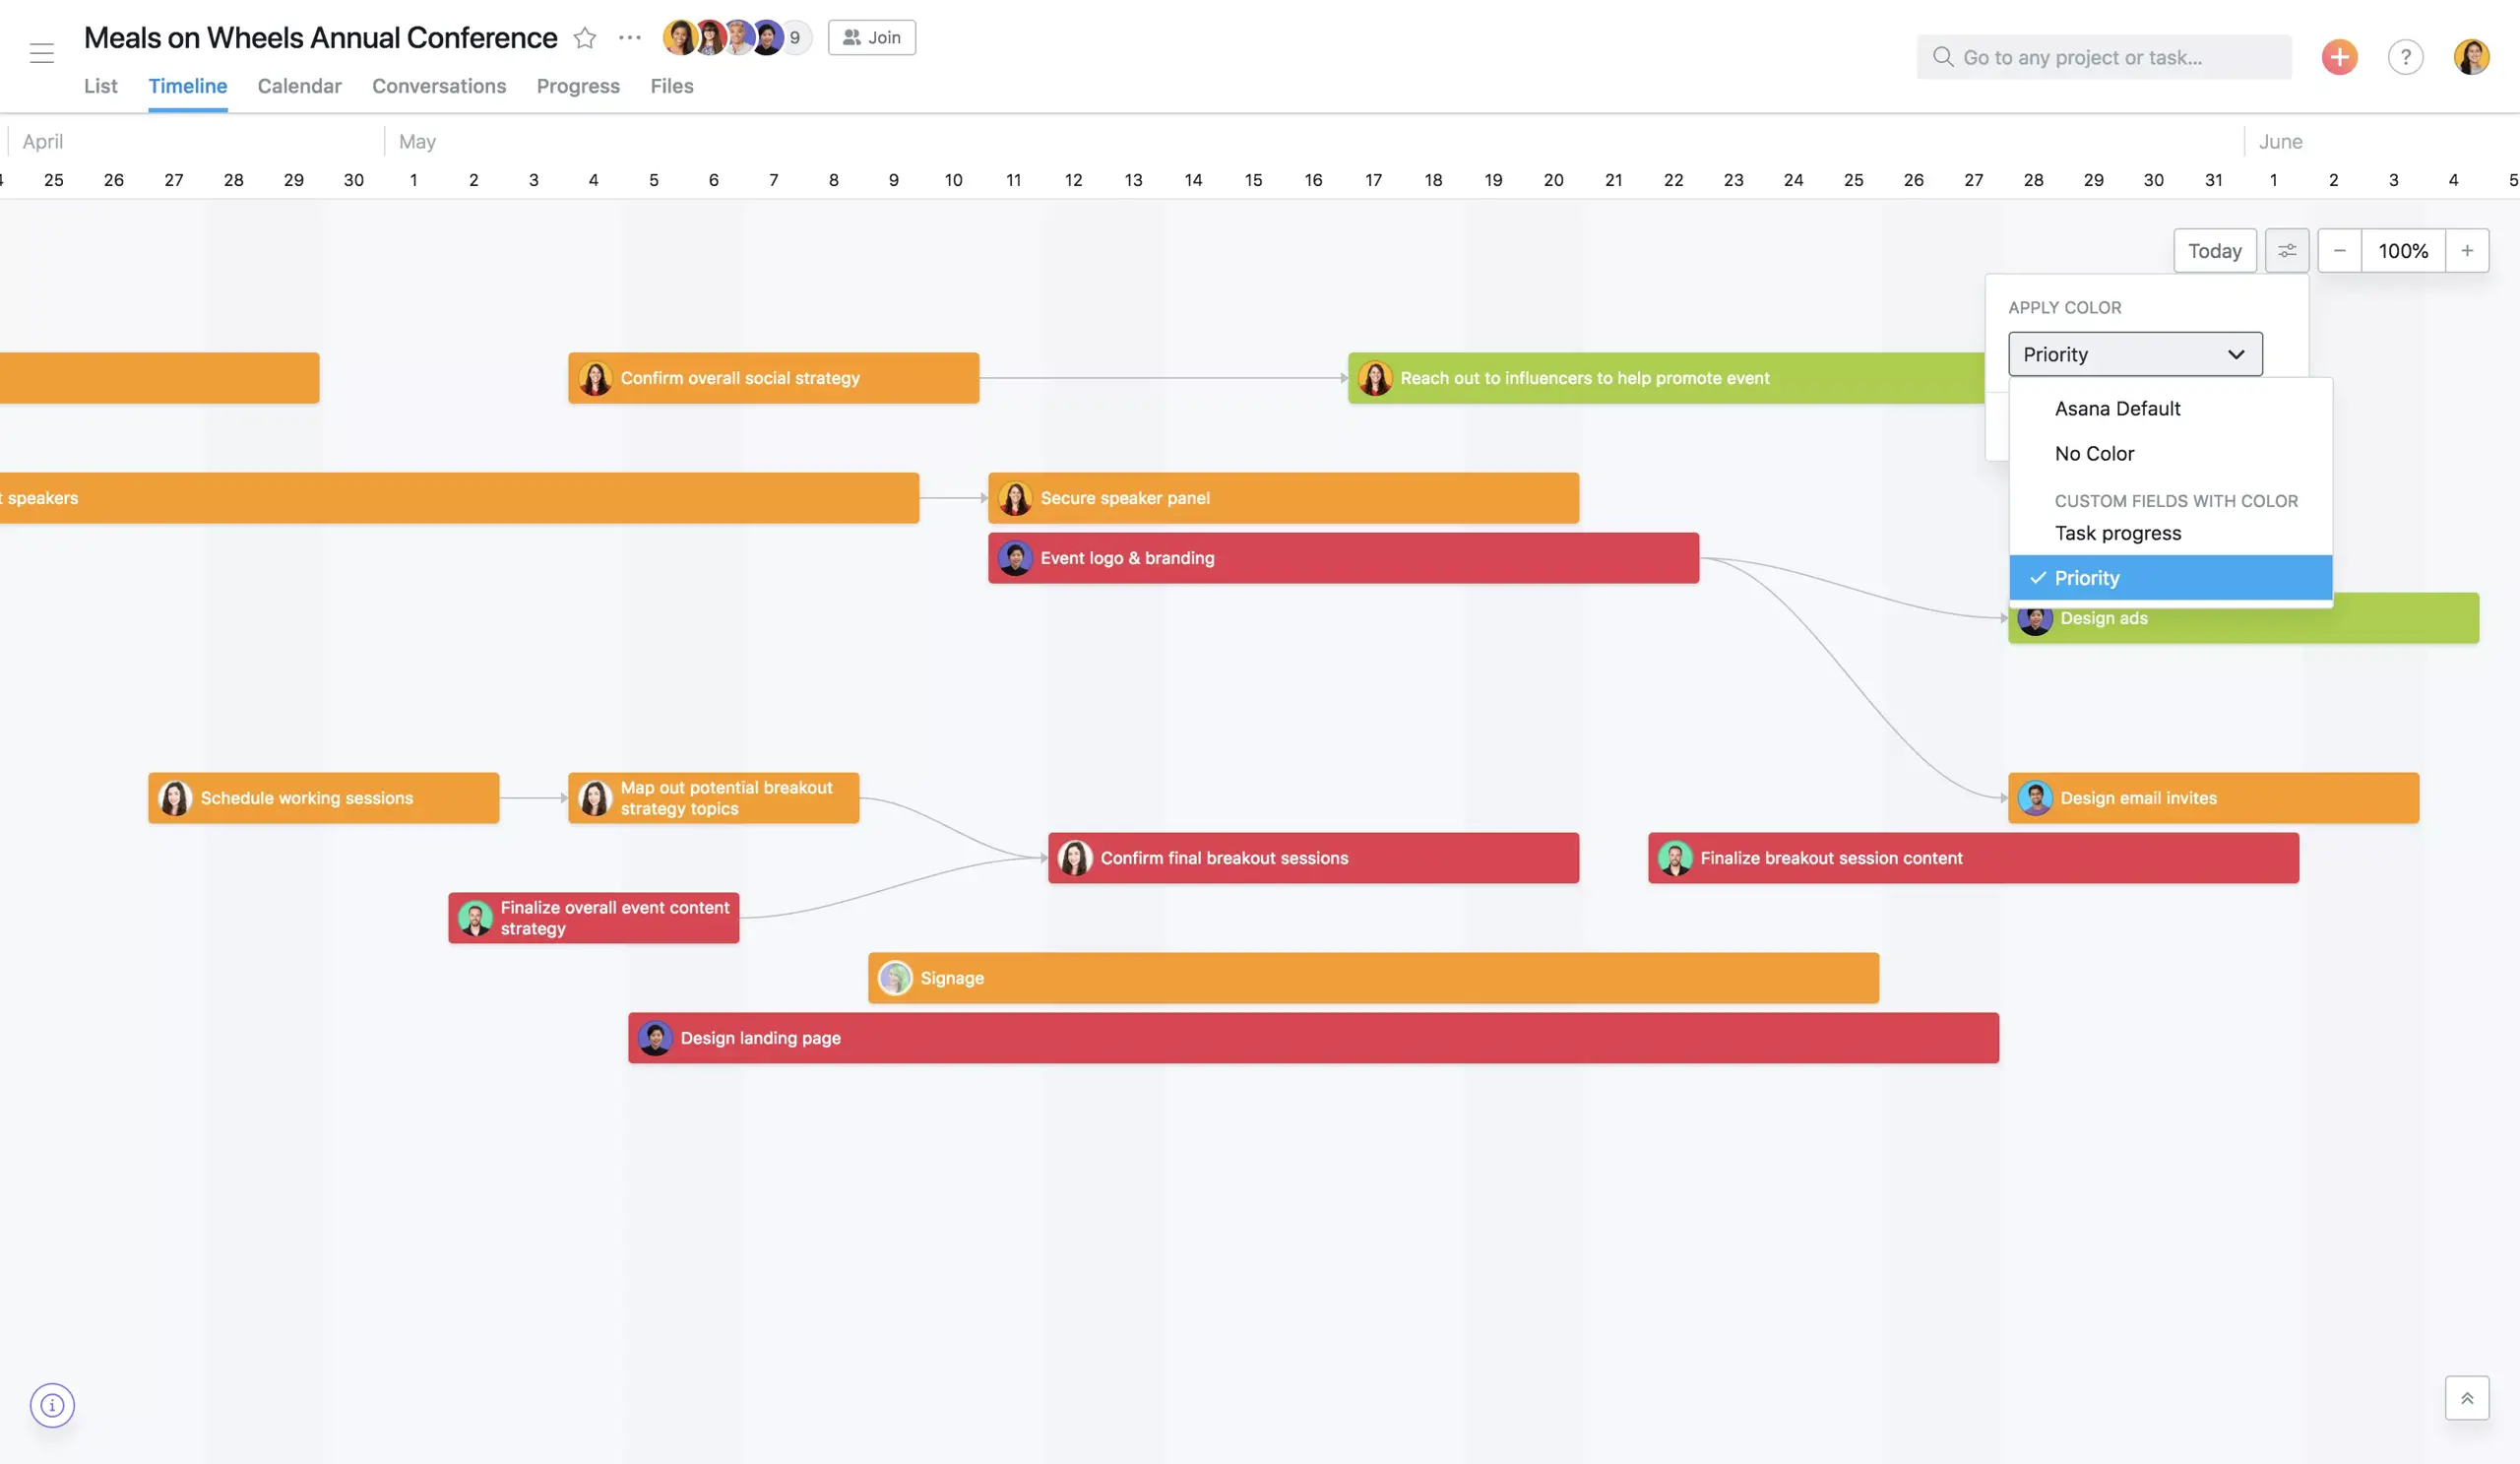
4. Specify colors on Timeline to give work context
With the recent launch of Timeline, you can now visually map out project plans to see how all the work fits together. This makes timing conflicts clear, but how do you know which tasks can be moved if you don’t know their priority? Add a Priority custom field with colors for each level to your project. This way, when you view your plans on Timeline, it’s clear at a glance if a task is high priority or low priority.
If your project includes multiple custom fields with color—like status for “on track,” “at risk,” or “off track”—you can switch between them to see work in different contexts to make more informed decisions.
To apply color to tasks on Timeline:
Set up your project in list or board layout.
Add custom fields with colors assigned to values.
Click the Timeline tab.
Click the menu icon in the top right of your Timeline.
Select the custom field you want to see under Apply Color.
If you’re using Asana Premium, you can start using these custom fields updates today. For step-by-step instructions on creating and managing custom fields, visit the Guide.
Not currently using Premium? Upgrade today to begin tracking more data for your projects so your team has the information they need to make better decisions, faster.